WebSocket protocol

Most of the web developers in enterprise sector are concentrated on HTTP as the main protocol for everyday’s work. But in some cases, it may be useful to prefer WebSocket. This article will do a short introduction to the most interesting features of WebSocket and provide a brief comparison with HTTP.

WebSockets provides a persistent connection between client and server. This connection is bi-directional by nature. It means that any party can start to send messages anytime when it’s needed(after communication is started).

The process of communication is started by the handshake. The client sends pure http request to the server with ‘Upgrade’ header and the server responses with the same header if everything is ok. Here’s an example:Client

Client sends request

GET ws://websocket.example.com/ HTTP/1.1
Origin: http://example.com
Connection: Upgrade
Host: websocket.example.com
Upgrade: websocket

Server responses

HTTP/1.1 101 WebSocket Protocol Handshake
Date: Wed, 16 Oct 2013 10:07:34 GMT
Connection: Upgrade
Upgrade: WebSocket

One more advantage of WebSocket against HTTP – drastically reduced amount of headers so the percentage of payload is much higher.

To conclude, WebSocket is bi-directional, full-duplex, real-time protocol for client-server interaction through the web. Java EE standardised WebSocket APi in JSR 356.

Servlet 4.0 api

A few months ago new servlet API, version 4.0 was introduced. The most of the upgrades are related to HTTP 2.0, the new protocol which significantly improves the quality of work with web.

I’ll show you what exactly new in this lib. In general, there’s only one major new thing that i was able to find:

  1. PushBuilder API. Provides rich interface to work with HTTP 2 pushes. In two words why do we need them: HTTP 2 changes one-to-one request-response mapping to one-to-many. It means that protocol allows to send more than one response for single request. Why do we need it? Because of performance! Just think about how often your browser requests a static resource from the same origin. In HTTP 1.1 client should send separate requests for those resources and it’s additional load for the network. PushBuilder is available from HttpServletRequest.newPushBuilder method. We can specify the resource that we want to push, additional http headers and http method(by default it’s GET).

HTTP 2.0

Http(Hyper Text Transfer Protocol) without exaggeration is the most popular web protocol. It was developed in early 1991 with present needs in mind and allowed everyone to share and access the information through the internet using HTML(Hyper Text Markup Language).

It’s a client-server protocol which means that resources should be stored on special kind of machines – servers, and users(clients) need to request this data from the server directly. The main actor of communication – resource. It’s identified by URI(Uniform Resource Identifier).

Http is stateless by design. It means that there’s no intermediate state between request-response pairs. Nevertheless, clients and servers can store information about the state in separately implemented mechanisms like cookies on client side and sessions on the server side.

Most of modern web programmers don’t work with HTTP directly. They use some third-party libraries and tools which provide abstraction, simplify development and increase quality. For example, Java programmers at most use Servlet API. This standard gives users already implemented HTTP-specific type system, for example HttpServletRequest, HttpServletResponse, HttpSession e.t.c.

Those programmers don’t know how HTTP works under the hood. So this article may be helpful for them. I’ll provide brief comparison of HTTP and it’s successor – HTTP 2.0.

So, as I said, the first version of HTTP(0.9) was developed in 1991.

In 1996 HTTP 1.0 was released.

1999 gives us HTTP 1.1, the most popular HTTP protocol for today. The most important new feature was a persistent connection between client and server.

There were no changes to the protocol about 15 years. But in 2015 new version of HTTP, 2.0, was standardized.  This release has major implications on how we, developers should design and implement our HTTP applications. So I propose to look carefully into the protocol and describe new features that provided by it.

At first, let’s look at some statistics about HTTP 2.0 usage:

http2statistics

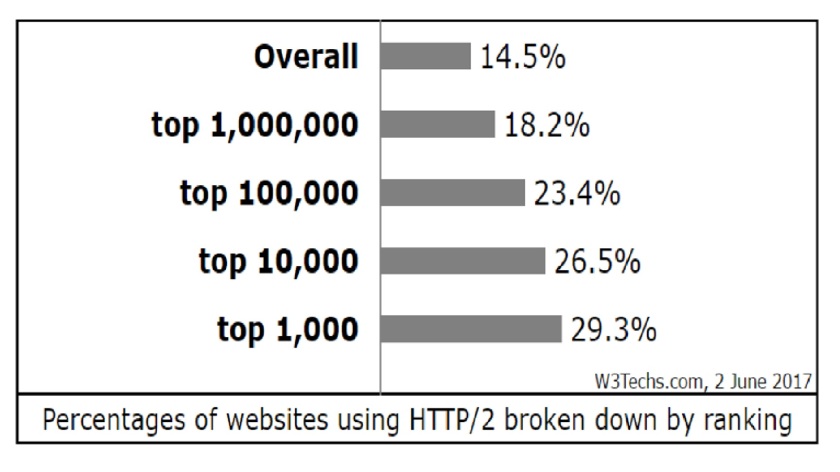
As you can see, it’s an overall trend to migrate from HTTP 1 to HTTP 2. So you need to learn in order to not to be overboard.

What’s new in HTTP 2.0? 

Binary frames.

Unlike HTTP 1.1, HTTP 2 uses binary data for communication. It has an indisputable advantage: data is compressed and it will take less time to translate it through the network. Here’s an image which illustrates the difference in this aspect between HTTP 1.1 and HTTP 2.

http2framing

Because of binary frames, HTTP 2.0 is not back-compatible with HTTP 1.

Multiplexing.

In HTTP 1.1. for multiple parallel requests(for example, static resource loading), multiple TCP connections were used. The new binary mechanism provides the possibility to not open few TCP connections for related requests. It makes interaction more productive.

Headers compression.

There’s a huge optimisation for headers transfering. HTTP 2 sends all of them in hoffman-compressed form, besides that, for the same TCP connection headers should not be sent twice. Second time only index of the header will be send.

Server push.

This is a new possibility for server to response for the client request more than once. It changes request-response one-to-one mapping to one-to-many.


I’ve listed only few new features of HTTP 2.0 but as you can notice, even they change our notion of how to write programs.

Session management in Java EE

As far as you know, HTTP is a stateless protocol, it means that for the user each new request to the same domain is not related in any way to the previous one. But it’s critical for some categories of applications to store the state between requests. The classical example is a shopping cart.

The session is a mechanism which provides some mechanism to wire different HTTP transactions to the same user activity and to store somehow the data.

The session management which is implemented on Java EE stack(session API) works in such way:

  1. User login into the application.
  2. The server validates credentials. If they match, creates the session using .getSession() method from HttpServletRequest. New HttpSession is created at this step. It has some expiration time which is 30 minutes without user interaction by default.
  3. The server responses with:
    Set-Cookie: JSESSIONID unique_value; HttpOnly
  4. The browser receives unique session identifier and stores it to cookies.
  5. Your browser automatically sends cookies for the given domain with the request.
  6. The server reads cookies and finds that JSESSIONID is already here. It finds the session by id using this cookie and changes last access time.

Here’s how session API is implemented. Don’t forget to invalidate your session after logout!

JWT-based authentication

JWT stands for Json Web Tokens is an open standard that defines a way for securely transmitting information between parties as JSON object. JWT can be signed using a secret or public/private key pair.

Here are two cases when you may want to use JWT:

  • Authentication. After receivement of signed by trusted authority JWT, the client should send it to the server each time when he requests the data.
  •  Information exchange. JWT can be used as a digital signature mechanism.

    The structure of JWT:

Consists of three main elements. All of three structural elements are divided by ‘.’ char. For example:
xxx.yyy.zzz

xxx – header,

yyy – payload,

zzz – signature.

  1. The header typically consists of two parts: the type of the token and hashing algorithm name. For example:
    { “alg“: “HS256”, “typ“: “JWT” }
  2. The payload consists of a set of claims. Claims are some statements about a user or his permission. Here are few predefined claims, for example:iss (issuer),
    exp (expiration time),
    sub(subject),
    aud (audience)
    The example of claims part are below:
    { “name“: “User”, “role“: “admin” }
  3. The signature has next structure:
    HMACSHA256( base64UrlEncode(header) + “.” + base64UrlEncode(payload), secret)

The protocol

  1. The client sends his credentials completing login form.
  2. The server checks credentials and if everything is ok responses with generated JWT. The secret that only server knows is used for signature generation.
  3. The client receives JWT and stores it in localStorage.
  4. Each time client generates request he puts JWT token as request Authorization header in such format:
    Authorization: Bearer
  5. The server checks the signature. If it’s valid, responses with requested data.

jwt.png

Openshift – free hosting for jvm applications

Are you interested in free hosting for your new jvm app? Solution is already here and the provider is ‘Red Hat’.

Openshift provides free space for ‘learning and experimenting’ with 1gb ram memory and 1gb storage.

Here you can find a list of steps to install your first spring boot application on openshift platform:

    1. Load spring boot seed from https://github.com/gshipley/bootwildfly.git.
    2. Do actual development.
    3. Build the project into .war.
    4. Create an account at Openshift.
    5. Load oc.exe tool and specify path for it for your operating system.
    6. Login to the openshift using next command in the terminal:
      oc login
    7. Enter your credentials.
    8. Use next pattern to create a project:
      oc new-project project_name
    9. Create openshift app using next pattern:
      oc new-app wildfly:latest~. –name name_of_your_application.
    10. Load the war file to openshift using:
      oc start-build name_of_your_application –from-file=name_of_your_war_file.war
    11. Expose the uri using given pattern:
      oc expose svc name_of_your_application
    12. Use next command to get the uri for access:
      oc get routes
    13. Add you .war file name to the end of the URI to access the application.
      * It may take some time to deploy your application on the openshift before it will be accessible.

DHCP protocol

DHCP(Dynamic host configuration protocol) is a network protocol, which allows users to get their IP addresses dynamically. It was standardized in 1993. The protocol can be described in the next steps:

  1. Client requests the ip address from DHCP server.
  2.  The server responds with some free IP address of the given network.
  3. Client receives the IP, and sends the confirmation upon receipt to the server.

TCP vs UDP protocols

There are two main IP protocols – TCP(Transmission control protocol) and UDP(User datagram protocol).

TCP is connection-oriented and two directional whereas UDP can work without connection establishment. The second one is faster, but TCP guarantees that the data will be delivered, otherwise the sender will be notified. So we can conclude that TCP is more reliable, whereas UDP is fast.

TCP guarantees that the order in which packets sent will be saved. UDP doesn’t promise it(you can manage by yourself on application layer).

Those two protocols have different header size: It’s 20 bytes for TCP and only 8 for UDP.

  TCP headers

tcp

UDP headers

udp

TCP needs three packets to be sent to establish the connection(handshake). UDP can start to work without the handshake.

HTTP, HTTPs, FTP, SMTP and Telntet are built over TCP.

DNS, DHCP, TFTP, SNPM, RIP, VOIP – work with UDP.

In java world, you can use the corresponding Socket vs DatagramSocket types to work with TCP or UDP.

Non-blocking IO and multiplexing

Traditional IO is blocking in nature. It means that for each user request separate thread should be created. Because each thread has a lot of performance costs and because thread can’t do any useful job before some IO is done, it’s not the best architecture for high-load systems. Java NIO introduces API for work in async, non-blocking way. It means that thread doesn’t wait until IO operation is finished, it just executes non-blocking logic and sends blocking stuff to the queue which processed by fixed-size thread pool.

Clustered vs non-clustered indexes

Indexes is a good-known and pretty well-working optimisation mechanism for database read operations. But not all know that there are two different types of indexes and they have drastically different performance characteristics.

Indexes are different in the way in which data is stored in databases. For first let’s discuss how data is stored when there are no indexes at all.

Imagine that we have a simple table:

create table phonebook(last_name varchar(50) not null, first_name varchar(50) not null, phone_number varchar(50) not null);

In this case the datastore is named ‘heap’ and there’s no order for records at all. It means that for any search database engine should read sequentially all of the records which presented in the table. Not so effective, huh?

Now let’s imagine that clustered index was created for this table. It means that all of the data should be organized in pages which are ordered according to clustered index values. Clustered index has a physical meaning in the process of storage and retirement of data. Because of this, only one clustered index could be created for the table. And one more thing to think about: it’s a good practice to use auto-incremented values as clustered indexes because in this case you’ll store each new record next to previous. Let’s imagine another scenario when you’re not using increment and your new record has, for example, the lowest value. This will force database server to push all of the existing records to make a room for new value.

In the contrary, non-clustered indexes have logical nature. They’re not related to physical ordering on the hard drive, but just links some indexed values to memory addresses. Because of this we have memory overhead and lower performance when comparing with clustered ones. One positive moment – we can create as much non-clustered indexes as we need on single table. There’s no limitations.

By default, clustered index is created for primary key constraint and non-clustered for unique constraint. You can change it using explicit instruction(think twice before do it!).